Project 2 Policies
This page outlines all the logistics of this project. All information about the project content is on the other page; this page does not contain any project content.
Overview
In this project, you will be provided with some cryptographic library functions. You will need to use those cryptographic library functions to design a secure file sharing system, which will allow users to log in, store files, and share files with other users, while in the presence of attackers. Then, you will implement your design by filling in 8 functions that users of your system can call to perform file operations.
This project is heavily design-oriented. The starter code we give you is very limited (it’s not much more than 8 function signatures), so you will need to think of a design from scratch that satisfies the functionality and security requirements.
For this project, you may either work alone, or in a team of two. We recommend working in teams of two, since it helps to talk through the challenging components of this project with a partner.
Grading Breakdown and Deadlines
Project 2 is worth a total of 150 points, broken down as follows:
| Task | Due | Points |
|---|---|---|
| Spec Quiz | Friday, October 13, 2023 | 5 |
| Checkpoint | Friday, October 20, 2023 | 20 |
| Final Design Doc | Friday, November 03, 2023 | 5 |
| Final Test Case Coverage | Friday, November 03, 2023 | 20 |
| Final Autograded Code | Friday, November 03, 2023 | 100 |
Checkpoint: Spec Quiz
To begin this assignment, you will complete a Spec Quiz, which will be released on gradescope.
The intent of the spec quiz is to help guide your understanding for the scope and requirements of this project. Understanding the spec is very important, as any mistakes in your understanding of what’s required will derail your design and make later fixes to your design/code extremely painful.
Checkpoint: Design Document
Before writing any code, you will start by writing down the design that you intend to implement.
Your design document can include any details that you think are important, including, but not limited to: What data structures (i.e. struct definitions) will you be using? How will you organize the data you need to store? When a user calls a function, what steps will you take? What cryptographic functions will you be using, and what inputs will you provide to those functions (e.g. what key will you use)?
You can organize your document in any way that seems clear to you. If you’re having trouble organizing your design doc, note that we have several “Design Questions” in green boxes throughout the spec. One way to organize your design doc is by answering each of those design questions, one by one.
For the checkpoint, you will need to submit a design document with your draft design so far. Your design does not need to be perfect, but should have significant thought put into it. The more you’ve thought about your design for the checkpoint, the more feedback we can offer you before you start coding. Having a stronger design for the checkpoint will also reduce the amount of re-coding and re-designing you need to do while coding.
Your design document must be readable and typed. Please limit your design document to 2 pages of text with 11 pt font or greater. There is no minimum length, as long as you’ve given a complete overview of your design (e.g. answered all the design questions in the spec).
It’s natural to feel that 2 pages is too short to describe your whole design. Our suggestion is to keep a detailed design document for yourself, which can be as long as you’d like. Then, once you’re satisfied with your design, summarize the key points of your design into a 2-page document that you submit for the checkpoint.
Your design document must also include a diagram that visualizes how you’re organizing the data that you’re storing. The diagram can be on a third page (it doesn’t count against your 2-page limit). You can use any drawing tool (e.g. hand-drawn, Miro, Draw.io, Docs, Publisher, etc.) and the diagram can be in any format that seems clear to you. If you’re having trouble with your diagram, you could check out our suggested template (LaTeX, PDF).
Deliverable: A design document containing:
- At most 2 pages of text, describing your draft design (e.g. answering the “Design Questions” in green boxes throughout the spec)
- A diagram showing how you’re organizing the data that you’re storing. (The diagram is not part of the 2-page limit.)
Checkpoint: Design Review
After you’ve submitted your design document, your project group should sign up for one 20-minute design review with a staff member. During this design review, you will present your design and receive feedback for it. Your design will be graded for correctness.
Design reviews tend to be more efficient in-person, but we’ll have some remote time slots if needed.
Deliverable: Sign up for a design review using this Google calendar link.
Some guidelines for scheduling a time slot:
- You need to have a design document submitted by the time of your design review.
- Do not sign up for multiple design reviews. We don’t have staff-hours to hold multiple reviews for one group, and we reserve the right to take off points if you sign up for too many slots.
- To cancel an appointment slot, delete the event from your Google calendar. If you need to reschedule, please cancel at least 24 hours in advance. If you need to cancel within 24 hours, you should additionally make a private post on Ed, and email the staff member hosting your design review, explaining why.
- If you sign up for a slot and don’t show up, we reserve the right to take off points, and we can’t promise that we’ll have time to schedule another time slot for you.
Grading:
- Everybody starts out with a score of 23/20 points, with early design doc reviews starting at 25/20 points. We will subtract points for mistakes, missing sections, etc. Note that the extra 3/5 points are a buffer, so your design doesn’t need to be perfect to get a full score.
- The maximum score is capped at 20 points (no extra credit).
Getting Started Coding
After your design review, you’re ready to start implementing your design in code. Follow these steps to get started:
- Install Golang. Go v1.20 is recommended.
- Complete the online Golang Tutorial.
- The tutorial can take quite a bit of time to complete, so plan accordingly.
- The tutorial is a helpful tool that you may end up referencing frequently, especially while learning Go for the first time.
- Accept the Project 2 GitHub Classroom Invite Link.
- At this step, you may receive an email asking you to join the
cs161-studentsorganization.
- At this step, you may receive an email asking you to join the
- Enter a team name. If you’re working with a partner, only one partner should create a team - the other partner should join the team through the list of teams.
- In
README.md, make sure to include the student IDs of both you and your partner, as well as your team name. - In the
client_testdirectory of the checked out repository, rungo test.- Go will automatically retrieve the dependencies defined in
go.modand run the tests defined inclient_test.goandclient_unittest.go. - It is expected that some tests will fail because you have not yet implemented all of the required functions.
- Go will automatically retrieve the dependencies defined in
- Optionally, we’ve provided a unit test framework that you can access in the
clientdirectory, where you can create unit tests for your implementation-specific functions insideclient_unittest.go.- If you would like to only run unit tests, please rename the unit test file to
client_unit_test.go(and an_betweenunitandtest) and rungo testin theclientdirectory. Reminder: If you later want to run unit tests with client tests together, make sure to change the name of the file back toclient_unittest.goand rungo testfrom theclient_testdirectory.
- If you would like to only run unit tests, please rename the unit test file to
If you ever need to pull updates from the starter code repo, you can do so with these steps:
- Run only once:
git remote add starter git@github.com:cs161-staff/project2-starter-code - Run each time you need to pull updates:
git pull starter main
Autograder: Implementation
Deliverable: Submit your implementation, in the client.go file, to the Project 2 Autograder assignment on Gradescope.
Before the deadline, the autograder will only check that your code compiles, and run the same basic tests that were provided in the starter code. You will not be able to see your actual score for the project before the deadline.
After the deadline, we will run all the functionality and security tests on your design, and release your final autograder score. Almost all tests for this project are “hidden” and are not run until after the deadline. This is done to simulate a real-world security environment: attackers don’t tell you ahead of time what their attacks will be, so you have to think proactively to defend against potential attacks. We encourage you to write your own tests to check the functionality requirements and simulate the attacks that we’ll be running on your system.
We have many years of accumulated knowledge about attacks, while you only have one semester to think about the project. Therefore, it’s expected that your design will not score full points on the autograder, and we’ll account for this when computing final grades.
Below is an example of a Project 2 score distribution from a previous semester. It doesn’t look like our usual project distributions (where most people get full credit). Instead, the distribution looks more like a typical CS 161 exam curve. If you’d like, you can think of this assignment as a long take-home exam.
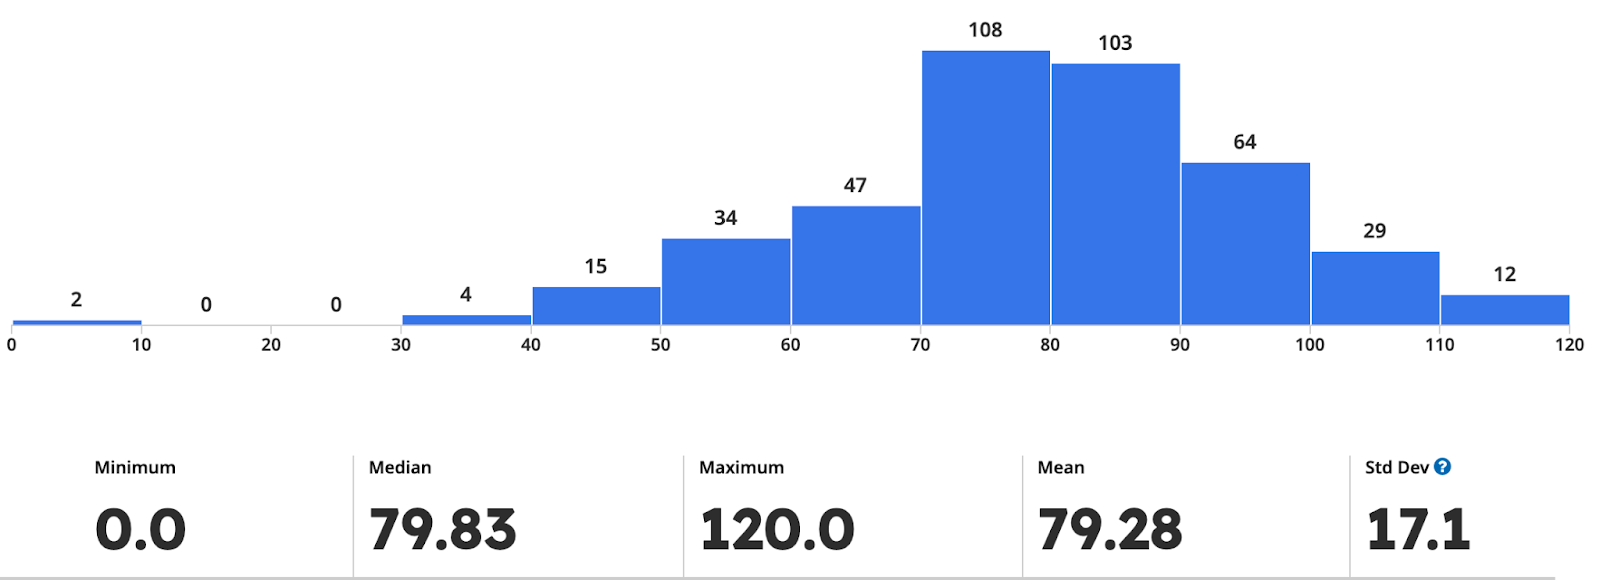
Each failed test (e.g. a functionality requirement that doesn’t work on your system, or an attack that your system doesn’t defend against), incurs a multiplicative penalty. For example, if every test has a 10% penalty, then each failed test multiples your total score by 0.9. In the example, failing one test results in a score of 90%, failing two tests results in a score of 81% (instead of 80% in the additive penalty model), failing three tests results in a score of 72.9% (instead of 70% in the additive penalty model), etc. We have lots of tests, and even a submission that scores relatively high will fail many of them. This grading system ensures that each subsequent failed test has less of an impact on your overall grade.
Your code cannot use any external libraries beyond the ones we’ve imported. Don’t try any adversarial behavior on the autograder (e.g. don’t try to DoS autograder resources). Attempts to circumvent the autograder will be considered academic dishonesty.
Autograder: Test Coverage
Deliverable: Submit client_test.go, a file with the tests you’ve written, to the Project 2 Autograder assignment on Gradescope.
We’ve provided some basic tests in the starter code, but you will need to write the majority of tests yourself.
To compute your test coverage score, we will run your tests on the staff reference implementation of client.go. The staff implementation contains 34 specially-flagged lines of code that correspond to interesting behavior (e.g. we might flag a line of code that returns an error if the HMAC is incorrect). We check how many flagged lines of code are executed as a result of running your tests.
Each flagged line of code you get to run is worth 1 coverage flag point. To receive full credit for test case coverage, your tests need to cause 20 of the flagged lines of code to execute. We cannot answer any questions about what the flag numbers on the autograder correspond to. It’s okay if you don’t score all 20 points here; it’s more important to make sure that your own design is thoroughly tested.
You may check your test case coverage by submitting to the autograder on Gradescope at any time before the project deadline. The coverage score you see on Gradescope is your final coverage score for the project (there are no hidden coverage flag points).
Note that getting a full score on the coverage flags does not guarantee anything about your own implementation. It can be a good indicator that you’ve written thorough tests, but there is no guarantee that the tests you’ve written are the same as the hidden tests we’ll be running on your own implementation.
We reserve the right to re-run the autograder on all submissions before releasing final scores. Therefore, if your code coverage score is non-deterministic, we cannot promise that the score will stay the same after re-running the autograder.
Final Design Document
Deliverable: Submit an updated version of your design document to the Project 2 Final Design Doc assignment on Gradescope.
This document should reflect the final design you’ve implemented in code. If you made modifications after the checkpoint, you can modify your checkpoint design document. If you didn’t update your design, it’s also okay to re-submit the same document you did for the checkpoint.
We’ll grade your final design document on completion and effort, not correctness. The correctness of your final design is checked by running the autograder on your code.